Group Manager
The group manager displays the following objects:
-
If you access the Group Manager in the calendar view by choosing > > : The objects selected in the calendar view (tasks, timelines, or groups)
-
If you access the Group Manager in the Selection Assistant by clicking the gear icon and then call up > : The objects grouped together in the Selection Assistant.
OR
If you have selected at least one task or timeline in the calendar view, you can call up the Selection Assistant from the context menu: > Selection assistant > . The Selection Assistant opens in a separate window. The selected object is already collected.
You can move and place the window freely. It displays the number of collected tasks and timelines. If you have added a grouped task or timeline to the Selection Assistant, all of the objects in the group are selected automatically. This is indicated by the red info symbol in the Selection Assistant:
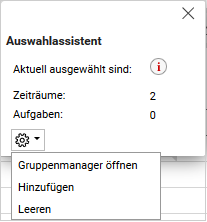
To add additional items to the group, go to the calendar view, select your required objects, and choose one of the following options:
-
In the calendar view context menu: > Selection assistant > Add
-
In the Selection Assistant: > Gear icon > Add
Once you have added all of your required objects to the group, switch to the Group Manager with > Gear icon > .
Note
The collection in the Selection Assistant is preserved when you close the window with the x icon. If you want to remove the tasks and timelines from the Assistant, select > Gear icon > Empty.
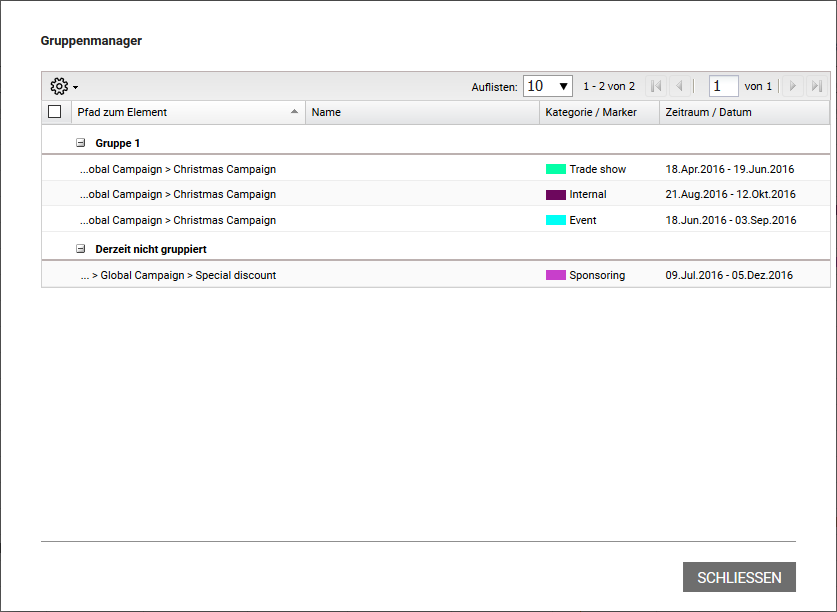
In the upper pane, you can use the field to configure the number of objects displayed per screen. You can switch between screens using the arrow icons.
The lower pane displays all of the selected or collected objects. If the tasks and timelines are already assigned to a group, the groups are listed first, and then the objects that are not grouped. In the very first column, you can select a task, timeline, or group. To do this, place the cursor above the relevant line and activate the checkbox that appears. The list also contains the following columns:
-
Path to the Element: The path in the tree structure to the element to which the task or timeline is assigned.
-
Name: The name of the task or timeline.
-
Category / Marker: This displays the visual indicator that is used for the object in the calendar.
-
Timeline/date for the object.
Once you have selected one or more objects, you can access the following functions by clicking the gear icon:
-
: This groups together the selected tasks and timelines.
-
: The selected tasks and timelines are added to the selected groups or multiple groups are merged into one group.
-
: The selected tasks and timelines are excluded from the group.
-
: The selected groups are dissolved.
Note
You can only use these functions within one screen. If required, configure the List field so that you can access all of the required objects on one screen.
To adapt the table to your requirements, you have the following options. The settings are saved for each user and can be adjusted again at any time.
-
Hiding/displaying columns: To change the displayed columns, move the cursor to the header of the table. An arrow is displayed on the right-hand side of the cell. Click the arrow and choose Columns. Activate or deactivate the checkboxes of the columns that you want to display or hide.
-
Order of the columns: To change the order of the columns, move the column in the header area using drag and drop. A tooltip appears that shows you whether the order of the current cursor position is changed.
-
Column width: Change the column width in the same way as in spreadsheet programs.
-
Sorting the displayed objects: To change the sorting, move the cursor to the header line of the table in the column to be used for the sorting. An arrow is displayed on the right-hand side of the cell. Click the arrow and choose Sort ascending and Sort descending.